The Challenge: #18: Re-make, Re-use & Re-fashion
Fabric: White linen for the heel, heavy crewel-work (machine-made, though) upholstery fabric.
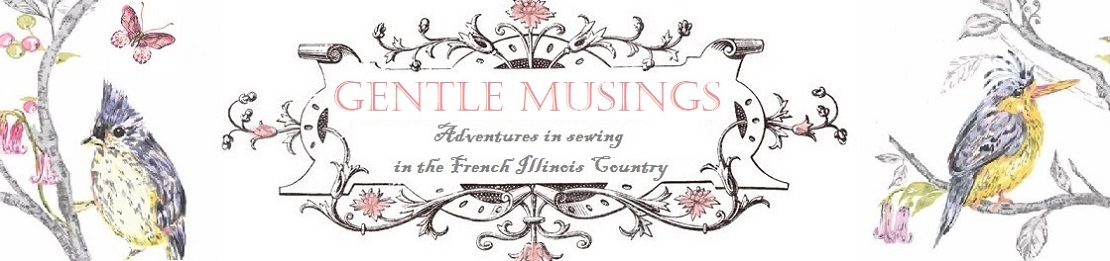
Pattern: Eyeballed it! I seem to say that a lot on HSF projects. But I did really look at quite a few neat extant shoes from museum or auction databases like these two:
(and then mine for comparison!)
Year: If only the heel were thicker, the pointed toe would be great for 1720-1740ish, which is what I would like to wear them for as well.
Notions: just thread and ivory vintage petersham ribbon (curves around corners much better than grosgrain) AND of course at the end, the lovely American Duchess "Fleur" buckles.
How historically accurate is it? The uppers are hand-sewn onto the existing shoe, but considering I just molded it around the frame already there rather than adding the sole over everything once it was done, plus a decent bit of fabric glue in some strategic places, and the smaller-than-accurate heel...it's about 50% I guess.
Hours to complete: Way more than I wanted. Probably a good 10 hours if I had worked straight through but I watched too much Jane Austen, Lord of the Rings and Star Wars marathons. Oops. But really it was rough going, my fingers are pretty sore and torn up even though using a thimble much of the time...I was sewing through leather quite a bit and I do not think I had a sharp or strong enough needle.
First worn: Just the other night for a try-on. They are TIGHT when I have stockings on. They will only be worth wearing for special occasions where there's no dirt anyway so I'm not too worried.
Total cost: I think I talked the seller on Etsy down to $10 for the shoes, I personally think they were hideous before but some people are saying they were pretty, so what do I know. The nice thing was, though I didn't know it when I bought them, that even though they're vintage they have never ever been worn, the soles were totally unmarked. The upholstery fabric sample was about $10 also, and the ribbon about $5 I think?
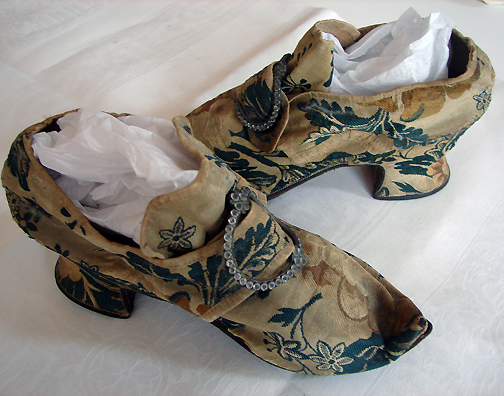
Before: 1980s? "Mootsies Tootsies" (Ew. Sorry, but, ew.)
I drafted a pattern with some "junk fabric" and had to re-do it a few times, but better with that than my limited upholstery fabric!
I pinned all the pieces on to make sure they would fit with plenty of room around the edges to turn under.
Only needed to make the pattern once though because you can just flip the pieces over to the wrong side for the opposite shoe!
I tried to center the pattern on parts of the crewel work that I liked best and wanted to be visible.
Pinned it all on once I got it cut out to make sure it would still work.
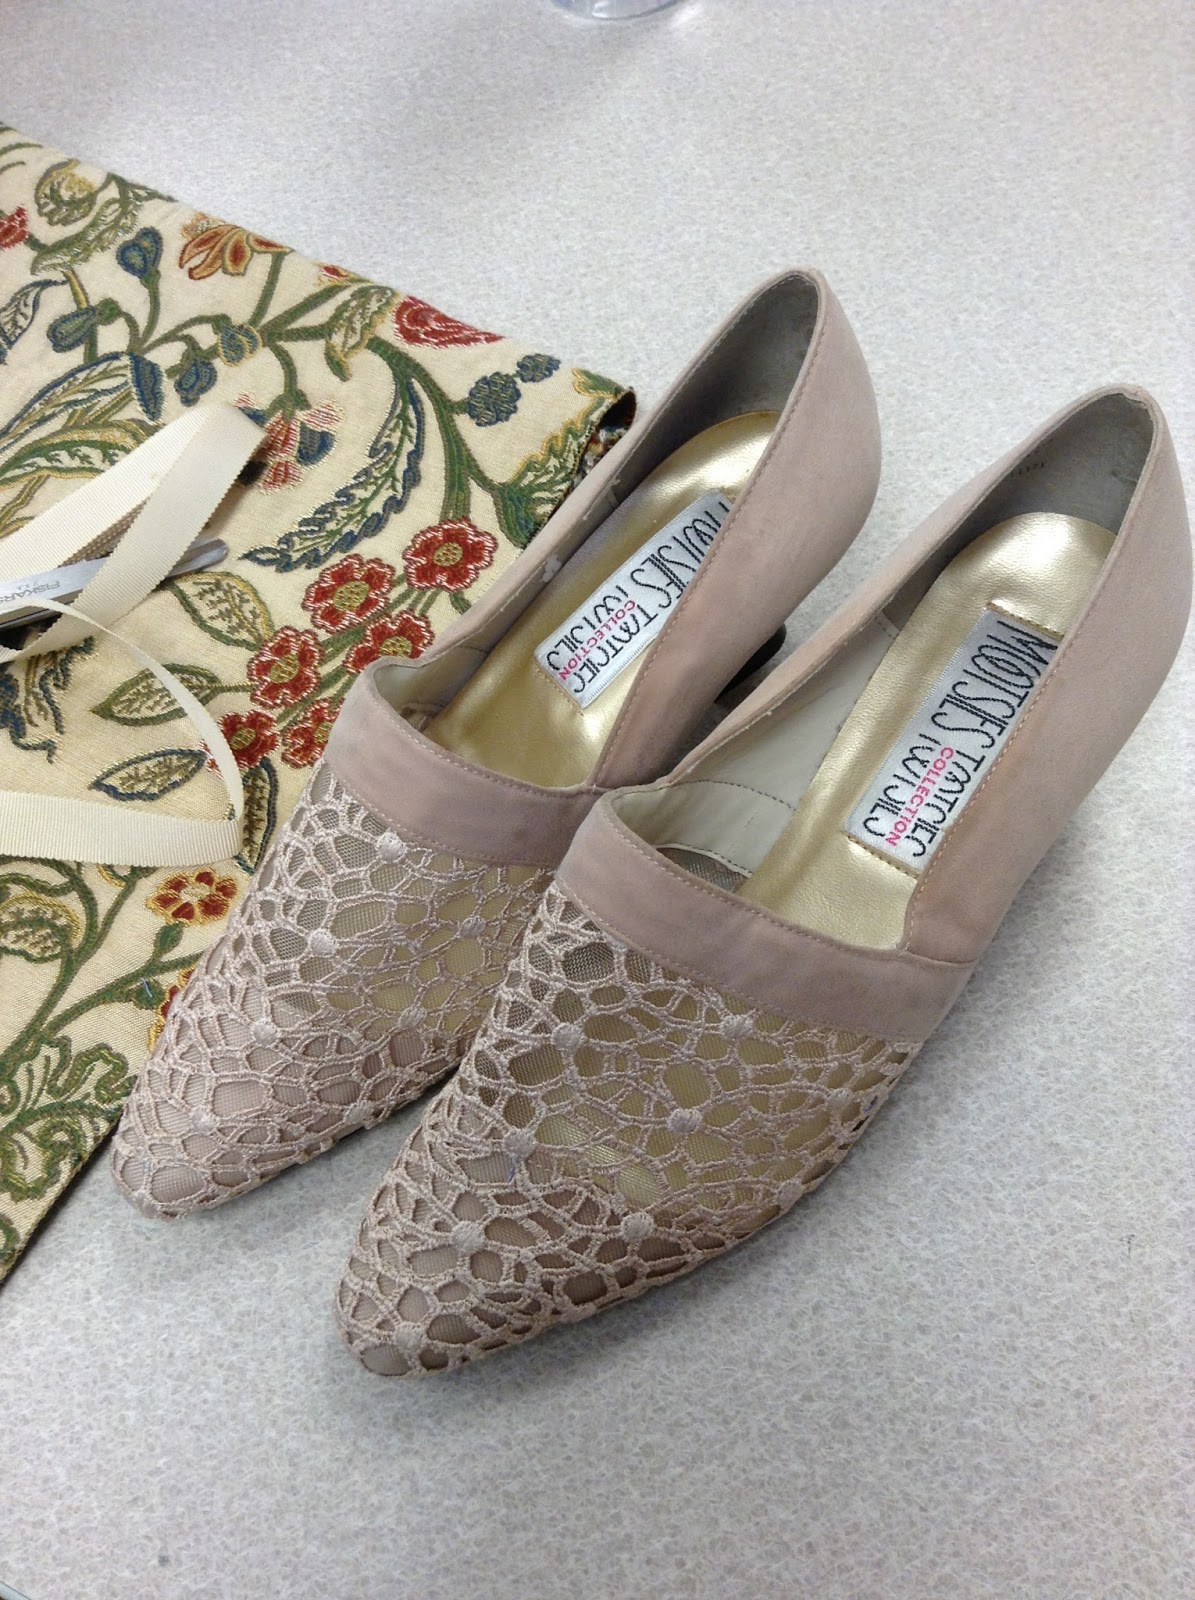
This is where I would do it differently if I got a "do-over"...it would have been much easier to rip the entire sole off and sort of corset-lace the fabric snug against the bottom, then glue the sole back on. I really wanted to avoid that because I was worried if I took the sole off once, it might never go back on securely; instead I rolled the fabric under in a hem and stitched it as close to the sole as I could get.
It was too difficult to try to get my needle in and out of the point of the shoe, so that last inch and a half you see is mostly glued down with fabric glue. I cheated. When I got to the tip though I was able to gather up the excess fabric and sew it into an even more pronounced, slightly turned-up toe.
One down! The petersham ribbon I bought intentionally wide enough to fold over equally on both sides of the fabric, so it was just stitched in a straight running stitch to bind the rough edges.
I'm sorry I didn't get a good picture of how I attached the linen to the
base of where my heel would be in the shoe...I did that part first,
whip-stitching it to the upholstery fabric as invisibly as possible,
then smoothed it over and down the heel and made a seam where it
would be hidden under the sole.
I'm really unhappy with how the heel got
covered. I cut the linen on the bias, but the heel was just too curvy
and I got nasty wrinkles and loose fabric around it no matter what I
did. But it's a low heel so it shouldn't show too much. Sorry I don't
have good advice where that is concerned! Ideally I would have covered it with the upholstery fabric as well, but I struggled and struggled with it and it just frayed so much even with Fray-Check that I had to give up the idea. Maybe some day I'll figure out the magic formula for making it work and go back and re-do the heels.
Most shoes like this you can pry the tip off the heel, carefully. Mine had two plastic nubs that slid into the heel itself. DON'T use your scissors to pop the tip, like I did. I just about gouged into my leg open before I went to get a screwdriver instead.
This is why I should have just ripped the sole off when I started: I ended up having to do it for the heel anyway. Luckily it was just a bit that needed to be pulled back, then I trimmed the linen as close as possible to the seam I made.
Then I glued the little bit of sole and heel tip back down with super glue. I wasn't messing around with fabric glue where the sole was concerned. I think I got the upholstery fabric sewn pretty close to the sole! It won't ever come off, that's for sure. You can see how un-used the shoe is here, brand new sole.
Tada! Finished shoes!
Interestingly, I did not need to poke any holes for the prongs of the buckles to go through. The fabric, though it looked tightly woven, separated completely naturally to make way for the prongs when I added the buckles. No holes, no broken or snapped threads...it was really interesting to see because I'm guessing that might have been the case with real 18th century fabric shoes as well!
Coal decided to photobomb...or is that...photobun?! He hates it when I work so hard on a project I ignore him, and he was particularly pesty during this whole project, jumping on the bed, jumping in my lap...I stabbed myself more than once due to his antics.
And my lovely new babies in the midst of my American Duchess eye-candy! If you think I have an 18th century shoe problem, I won't tell you about my modern-day footwear hoarding issues.
Don't hesitate to leave me any questions in the comment section, I will do my best to be helpful! This was my first (and possibly only) attempt at covering shoes so I am a total amateur, but it was a fun experience!